
What follows is the most contentious article we’ve ever written.
Don’t believe us? Three brewing magazines rejected it on exactly those grounds, one of them even paying us to kill the article.
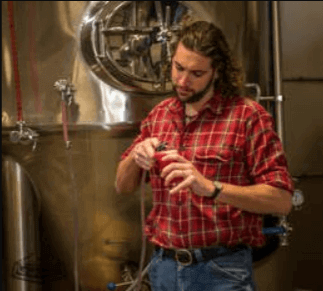
What’s weird is that it’s just an article about how we brew.We don’t make fun of other meaderies, and we state repeatedly that there is nothing magical about our system, it’s merely a recounting of how we brew at Groennfell Meadery.
This article is being released, at long last, in collaboration with Basic Brewing Radio where Ricky and James discuss how it came to be that our hobby, which began with the phrase, “Relax and have a homebrew,” devolved into so much hand-wringing and bellicose posturing.
MAKING CRAFT MEAD AT HOME IN LESS THAN THREE WEEKS
If you use raw honey, you don’t even need to add yeast.
Heck, you don’t even have to heat the damn stuff if you don’t want to!
So, how is it that books, websites, forums, Facebook groups, homebrew meetings, and even national conferences are devoted to the subject? Considering that we’re talking about combining honey and water, how am I supposed to write two thousand words on the subject without devolving into a discussion of mixing paddles?
Then again, baguettes are nothing more than flour, water, and yeast. It’s admittedly very difficult to leverage that information into a well-reviewed French boulangerie.
Before going into nitty gritty details about honey varietals, yeast nutrient, and degassing, let’s talk about why you’d even want to brew mead at home. Mead gets a bad rap because there’s a lot of bad mead out there. If you’ve ever had a terrible home-brewed beer, the theory is that the brewer screwed it up. If you’ve had a bad mead, this poor ancient beverage takes the blame.
If you haven’t gotten your hands on a craft mead (commercial or homebrewed), what we’re talking about is single-digit alcohol, dry, with bubbles, and packaged in cans or beer bottles. We’ll have much more on this definition of craft mead shortly.
Chances are good that you’ve never had anything quite like it since there are only a handful of meaderies and homebrewers producing this kind of product. Think dry British cider, but made from honey.
In many ways, mead is the ideal beverage for the homebrewer:
- There’s no special equipment; if you have a brew bucket, you have all you need to make mead. You don’t even need a carboy.
- It is unbelievably quick to brew. Do you have ten minutes and a power drill? Well, you have a mead.
- The ingredients are actually surprisingly inexpensive. Yes, good honey can be a bit pricey, but no hops or liquid yeast definitely balances the equation.
- Most of your friends have never had mead. Why did we become homebrewers if not to impress our friends?
- Your mead can be ready to drink in three weeks.
Let’s start with this last point. You have been lied to, my friends. You’ve probably been told that mead needs to be laid down in a cool, secluded grotto, protected from passersby and drunken compatriots for no less than a decade… two if you can manage it. This is not true.
There are two good reasons you have to lay down mead:
- If the mead is extremely high in alcohol – like, above 16% – extended aging is required just as it is for all high-octane brews.
- If you’re bad at making mead.
There. I said it. Off-flavors and extended aging are a result of people not knowing the fundamentals of what they’re brewing. And why shouldn’t it be that simple? Isn’t that the root cause of most off-flavors? People not knowing what they’re doing?
Before we dive into specifics, we need a full disclosure. In brewing, there are three categories of information: Facts, Opinions, and Opinions Masquerading as Facts. This third group is, by an enormous margin, the largest category.
I have spent a decade researching mead brewing and history for my articles, lectures, and YouTube show, “Ask the Meadmaker.” I have a small research staff and a copy editor. I brew 1,000 gallon batches and 5 gallon batches of the same product to test scalability. I have homebrewers from around the world testing my claims routinely.
And yet, I still probably have tons of opinions masquerading as facts. There’s just not a huge amount of money in mead research, and biases have a way of creeping in.
That said, what I’m going to offer here are facts to the best of my knowledge, and each claim has been tested on every scale of brewing, from jugs to conical fermenters.
As I said above, it’s really a lack of fundamentals that stymies the budding meadmaker. Mead is, in a few key ways, fundamentally different from wine, beer, and all other fermented beverages. By understanding these differences, you’ll be well on your way to making fine craft mead at home.
Grapes would love to become wine if you just give them a chance. Heck, just try to stop them. Honey? Ever hear that legend that archeologists were able to eat honey from ancient tombs? Well, it’s true. The combination of pH, defensins, hydrogen peroxide, and moisture content makes honey indefinitely shelf stable.
Add some water, and you’ve only modified the moisture content; you still have other antimicrobial elements to deal with. Further complicating the matter, your mixture is essentially nothing more than sugar water. Just like humans, yeast can survive on an all-sugar diet for a while, but it sure as heck won’t thrive.
A poor initial fermentation is the root cause of a lot of the cardboard, sulfurous, or Honeycomb Cereal flavors in homebrewed (and some commercial) meads.
When I’m teaching classes, my first piece of advice is to make your must (your honey water mixture) as much like beer as possible. Yeast loves beer. Add yeast nutrient or find another way to add minerals and nitrogen.
Another cool thing? Pollen is a natural yeast nutrient which is why raw honey creates healthier, more reliable fermentations.[1] It also has many, many more volatile flavor and aroma components than filtered honey, which in turn improves the flavor of the final product. More on this subject later.
You know what term you’ll never hear me use on my show or lectures? “Traditional Mead.” Asking what mead traditionally tasted like is like asking what people traditionally wore: Give me a century and a continent, and we can start to narrow it down.
Our ancestors often dumped the whole spice cabinet right into their meads. Cinnamon? An antioxidant which helps prevent papery-off flavors and sherry aromas. Thistles and sage? Preservatives. Fruit and grain? There are your nutrients! The possibilities are endless.
Chances are good that people historically drank very little straight mead (mead with only honey in the fermentation). With modern techniques, yeast, and nutrient, it’s much easier to brew straight meads, but it can be just as fun to go a little nuts.[2]
Yeast is, obviously, the workhorse of any brewhouse. Understanding strain selection and the life cycle of yeast can make or break a good mead. Once you’ve made the environment (your must) as hospitable as possible, it’s time to go deep with your knowledge of these tiny little friends of ours.
Yes, there are mead-specific strains of yeast out there, and they’re great. They’re also expensive. For my money? D-47 from Lalvin. Wine strains are prepared for the adverse and stressful conditions of a mead fermentation. Nevertheless, with good nutrient loading, beer strains can work wonderfully!
We use mead-specific house strains, wine strains, wild strains, and beer strains at our meadery.
DO NOT USE CHAMPAGNE YEAST. Immediate exception: If you have a stuck batch, Champagne Yeast is your friend. But generally speaking…
This is another one of the pieces of advice going around the internet about mead which isn’t strictly speaking incorrect, but is a little misguided. Let’s look at the facts: What is champagne yeast designed for? Creating a lot of alcohol and very little flavor. In fact, it’s known to strip flavors. Why on earth would you buy expensive honey then scrub everything special out of it?
There will be plenty of people who have made award-winning meads with champagne yeast who will be miffed at this assertion. They probably made very high alcohol meads which had enough volatile compounds that some survived the fermentation. To wit, back-sweetening with honey can also achieve similar results.
For all the complexities of yeast propagation, mutation, primary metabolites, secondary metabolites, and so on, the life cycle of yeast is fairly straightforward.
When you pitch your yeast, the cells initially spend a period acclimating to their new home (your mead) after which they rapidly begin to uptake oxygen and nutrient. This whole process takes about one day. Yes, 24 hours. So why, dear friends, does the internet tell you to stagger your nutrient additions?
Sure, nitrogen is used in small quantities during the whole of fermentation, but the idea that the yeast won’t uptake the vast majority of what it needs from the get-go doesn’t hold up to experimental data. You can stagger if you want, but want to know what we do?
When we mix our must, we add about an ounce of nutrient per five gallons of mead. Does that sound like a lot? Well, what the yeast doesn’t use just settles out. Not all nutrients are created equally, some will give you weird off flavors if you use too much of them. We love Wyeast Wine Nutrient Blend, but you should experiment!
Then comes oxygenation. We obviously have an oxygenation system, but a good vigorous pouring from bucket to bucket works wonderfully for the homebrewer.
Next we pitch the equivalent of a packet of yeast per gallon. Dry yeast is cheap and super good at what it does. Since this article is about our practices, I will tell you that we don’t rehydrate. We sprinkle a few kilos of yeast right on top of our must. Fermentation often begins within four hours.
Most dry yeast manufacturers recommend rehydration, of course, but in side-by-side comparisons, we haven’t found a flavor difference, and we reliably see faster start times using our method.[3]
One of the big things which retards fermentation is excessive dissolved CO2. If you find that your fermentation is painfully slow, go ahead and rouse up the yeast while gently stirring out the bubbles.
Remember, however, that every time you open your fermenter you’re potentially letting in buggies. Also, that CO2 is there to protect your mead from oxidation and other infections. If you have enough oxygen and nutrient, you should be able to jog right to 9% alcohol in a matter of days in a temperature-controlled environment. We generally stick to the top recommended temperature of the yeast strain we’ve chosen if not a little above.
Your honey is everything when it comes to your mead. This may sound axiomatic, but it bears repeating: Your honey is the foundation of every aspect of what your mead will be, it behooves you to understand it backwards and forwards.
Also, to get this out of the way, it is possible to make extraordinary mead from grocery store honey, it’s just much more challenging. Think about it like brewing beer with cereal from the supermarket; it can be done and can even be a fun challenge, but you’d better know exactly what you’re doing.
Raw honey has a veritable cornucopia of vitamins and minerals compared to its pasteurized, filtered brethren. This doesn’t mean you can get away without using nutrient, but it does mean you’re making up a smaller deficit.
Raw honey is also packed full of complex aromatics and flavor compounds which are volatilized or broken down during pasteurization. Many of the beautiful floral aromas present in high-quality meads come from the use of raw honey.
You don’t need to break the bank, of course; there are many good resources online (and probably in your hometown) to help you source good honey at reasonable prices. Shop around and, once you find a good source, jealously guard it from all of your friends.
Probably the most contentious subject in meadmaking is the boiling versus sulfites debate. I’m going to make it simple:
- Boiling, even just heating to pasteurization temperatures, is going to volatilize many of the compounds you just paid a premium for.
- Gently warming your honey to break down the crystals to mix it with water is fine. Our entire system runs at about 104°F just to get our must to combine. This does not harm your mead.
- Sulfites are a miraculous compound which kills wild yeast and has essentially no effect on humans (despite what your mother-in-law and large portions of the internet will tell you).[4]
- You don’t need to do either (sulfite or heat) as long as you accept that some of the fermentation is going to happen as a result of the wild yeast from the honey.
Got it? Warm to mix, but don’t boil. Add sulfites if you want, but don’t if you don’t want.
Many meads come out flaccid, thin, and boring because of the old adage “garbage in, garbage out;” a boring honey will not make an interesting mead. Unless, of course, you’re making a pyment, braggot, cyser, or any other mead in which a substantial proportion of the fermentables come from another source.
Braggots, especially, can swamp the delicate flavors and aromas in high-quality honeys. Just as we don’t pour Pappy Van Winkle into our Bourbon Barrel Stouts, you probably won’t want to waste your Manuka honey on a braggot barley wine.
Here’s the most contentious part of our article, so prepare yourself and remember that this is the definition we use at Groennfell Meadery and is not universally accepted: We strictly define craft mead as a low-alcohol, carbonated product, while honey wine is still and has a higher abv.[5]
This is pragmatic rather than an arbitrary definition since many of the “rules” for making lower abv meads are different from high alcohol products. For example, craft meads can forgo multiple yeast and nutrient additions as well as extended aging.
Our meads are designed to be carbonated. Just like a flat beer is nearly undrinkable no matter how good the carbonated version was, a lot of the brightness and complexity of craft mead comes through with the carbonation.
There’s also the added advantage that carbonation makes your beverage drinkable faster. Carbonation does wonders for accelerating the finishing process.
We force-carbonate in-house because a few of our strains produce sulfurous components when stressed at the end of fermentation. Craft mead takes carbonation very well in home kegerator systems and is renowned for knocking your friends on their rear ends. If you’re a bottler, never fear, mead can be bottle-conditioned like a beer!
We’re not clarity nuts. A few of our meads flocculate like billy-o, and we don’t mind in the least. But our most popular meads are the ones that retain a bit of a haze. Our theory is that these residual components improve the mouthfeel and bring subtle flavors that would otherwise precipitate out.
Then again, that might just be an opinion masquerading as a fact.
Craft mead, as we define it, differs from honey wine in two key ways:
- It is always carbonated.
- It has single-digit alcohol.
It is also usually much dryer, sometimes with a final gravity below 1.000, but this isn’t a rule.
The way to go from honey to glass in three weeks is simple:
- Start with great honey.
- Gently warm but never boil your must.
- Oxygenate the heck out of it.
- Go heavy on the right nutrient.
- You can’t pitch too much yeast.
- Keep it warm enough during fermentation.
- Carbonate it.
[2] McGovern, Patrick E. Ancient Brews: Rediscovered and Re-created. New York: W. W. Norton and Co, 2017
[3] Our brewing log shows an average start-time of 20 hours with cone-harvested yeast, 8 hours with re-hydrated yeast, and 4 hours with dry sprinkled on top. Our theory is the high-level of oxygen exposure in the head-space of the fermenter is what makes the difference, but this is mere conjecture.
[4] TL;DR: It’s safer than table salt.
[5] Google “Define Craft Mead,” and you will find an extended discussion on this topic.